The Zone System
Chapter 3
Rather famously Ansel Adams and his partner Fred Archer developed what they called the zone system. This was born out of a desire to get beyond what was available as average metering where the exposure was measured for the scene as a whole. Ansel and Fred were fanatical about getting the right tonal range on a negative and making sure it would all be able to be printed on photo paper. Working in black and white they faced the challenge that the negative could hold a wider range of tones (what we call dynamic range today) than the paper the image was printed on.
In those days the print was the thing. Without the internet and Instagram this is how they shared and distributed their work.
They also worked with large format field cameras where each image was a complete sheet of film. So not only were they interested in making sure the tones of the image ‘fit’ on the negative in the sense it was not over or under exposed they also had to be concerned it would ‘fit’ the more limited range of the photo paper.
This means the zone system has two aspects, making the exposure to get the tones in the ‘right place’ and then development. They used techniques during the development to expand or contract the range of the film. If a photo was taken on a foggy day without bright sunlight they might ‘expand’ the development so the tones use more of the range of the film. If the scene had a lot of contrast then they might contract the development to compress the tones to a smaller range.
The development aspect, however, is really only relevant for those that wish to print their images in the darkroom AND where each image is on a separate sheet of film so that each image can be developed differently. In modern photography even with film these concepts are not mainstream and I have therefore ignored the development aspect. Most people who shoot film today use 35mm or medium format roll films where development of the individual images is not possible. Also people tend to share photos online as JPEGs and when they do print them, do so with digital printing techniques. Digital techniques are a substitute to the development process of expansion or contraction.
Why Do We Care?
Many photographers try and get their images correct ‘in-camera’ that is at the time the exposure is made. Not relying too much in doing things ‘in-post’ (postproduction) with the likes of Photoshop or Affinity. Why is this?
Certainly, from a film standpoint there are many advantages but they also extend to digital work as well. It all boils down to the limitations of your sensor be it digital or analog (film).
If we are talking about slide film at one extreme even a half stop over or under exposed will ruin it. This can’t be recovered by Photoshop, no matter how well scanned the film is. Even with digital sensors highlights that are blown have no texture to them and there is no magic to recover them, the same is true for deep shadows. Clearly there is an advantage to getting the best result in-camera.
So to summarize we will discuss the Zone System but only as it applies to exposure and not the development of film.
How does the Zone System Work?
The basic concept is to divide the range of possible exposure into 11 zones with 5 (V) at the center. (The Zone System uses roman numerals for each zone and I will continue with that tradition. Hopefully it isn’t too burdensome.) There are five zones above the center V and five zone below. It was in Ansel Adams estimation that there were this many discernable differences in exposure on black and white film. Each zone represents a stop of exposure (we will get to the concept of stops or f-stops later) and that moving from one Zone to an adjacent Zone represents on stop of exposure difference. Now film is analog and does not work in these discrete steps but it becomes a useful way of organizing and understanding film’s response to exposure.
Each zone is assigned an attribute to help understand it better. At the center, at Zone V, is what is referred to as 18% gray. To the right you move towards pure black Zone 0 with no detail. In between there are different amounts of detail that are conveyed. The same is true for the area to the left of Zone V except that Zone X is pure white and devoid of tone or texture. (This is the area also called blown highlights.) In each extreme we have reached the limit of the film to convey any detail or information about that part of the scene. Zones 0 and X have their uses. Having a true detail-less black and/or white can be essential to a good image. But too much and well… you understand.
18% Gray
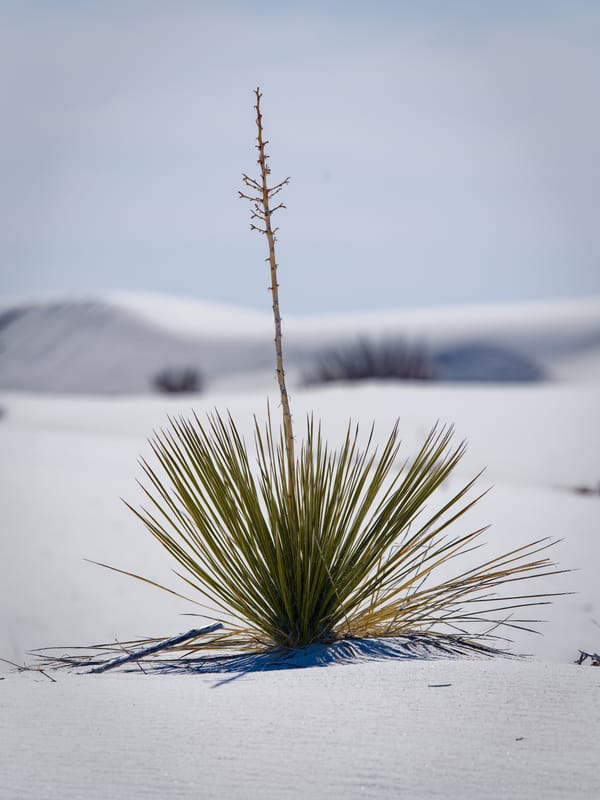
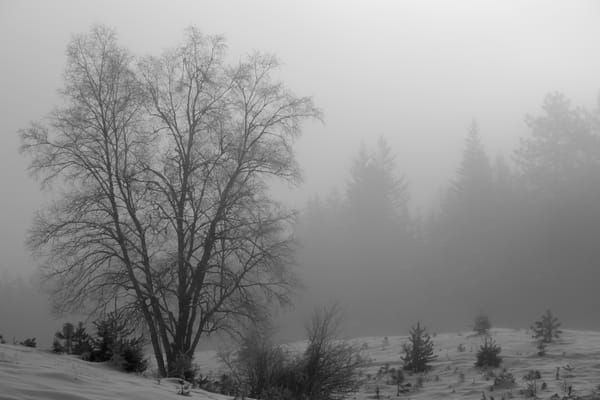
In the dim distant reaches of the development of photography it was decided that 18% gray was the correct value for an average scene. The reasons are not terribly scientific but if you had to pick a number that was reasonable for most photos people took then this was what the meter needed to see. I wouldn’t get too hung up on the 18%, it is just a number but it is the basis for all modern meters. When a conventional average meter looks at a scene it assumes it is going to average out to this 18% gray value and shows a corresponding exposure. This does not work when a scene is dominated by a certain brightness value such as snow or fog.
This 18% gray value corresponds to Zone V in the center of the zone system. The important thing to remember is that it is gray. If you want something to be white (or black) it should not be in Zone V!
Exposure: F-stops, Aperture, Shutter Speed, and Ev
There are a number of terms that need to be understood in order to understand the concept of exposure and metering. Firstly, exposure refers to how much light strikes the film or sensor. This needs to be controlled so that we have neither too much (overexposure) or too little (underexposure) light on the film. This control is achieved by a combination of shutter speed and aperture.
Each film or sensor has a rated sensitivity and this is referred to as ISO. Each doubling of ISO is a doubling of the film or sensors sensitivity. So ISO 200 is twice as sensitive as ISO 100. And ISO 800 is three times as sensitive as ISO 100.
The shutter opens to allow the full amount of light possible through the lens subject to the aperture setting. The longer the shutter is open the more light strikes the film or sensor. The aperture is a variable sized hole that regulates the amount of light by making the opening smaller or larger. Typically this is an iris-like mechanism. The combination of the two ultimately decides how much light gets through.
These two mechanisms then need to be calibrated in some consistent fashion. That is so that we can make repeatable settings each time. The shutter speed is marked in seconds or fractions of seconds 1 second, ½ second. ¼ second etc. These all correspond to a halving or doubling of light. This doubling or halving of light is a consistent idea in photography and is called stops.
The aperture is marked as well but with more arcane, if familiar, numbers 2, 2.8, 4, 5.6 etc. These are called f-stops and also relate to a doubling or halving of light. As the f-stop number gets larger the amount of light admitted reduces. (These numbers are related to the area of the opening and as such are multiples of the square root of two.) When we speak of ‘stopping down’ we mean smaller apertures which means larger numbers. (I know, confusing right?)
Because both shutter speed and aperture are set in terms of this double or halving of light, they become interchangeable. So, if you have the aperture set to f5.6 and the shutter speed at 1/500 second you could ‘stop down’ one stop to f8 on the aperture and slow down the shutter one stop to 1/250 second and have exactly the same exposure.
I will not be going into the detailed reasons why, but the aperture sets the depth of field (how much of the image is in focus) and the shutter speed relates to how motion effects the image. These are important picture-making parameters, but you will have to research them elsewhere.
The next concept is exposure value or Ev. This is a mathematical relationship that gives a single number to express an exposure. Ev progresses in doubling and halving of light values as well. So an Ev of 4 has half the light as an Ev of 5. This can then be translated to an array of different shutter speeds and apertures. Ev is what most meters use to calculate shutter speeds and f-stops. Old analog ones had a manual dial with all the valid shutter speed and aperture combinations and digital meters serve up one combination at a time.
I will be talking a lot about Ev as that is what traditional spot meters started with. Many modern digital meters don’t show an Ev or you do extra work to find it. Note also that the Zone System is divided up into intervals of doubling or halving of light. This means that moving up and down through the zones is the same as changing Ev or apertures or shutter speeds. Now the power of this consistency can be understood.
Click below for next section…
 Doug Morse